More often than not, students have a good sense of how they’re doing in a class, and direct feedback from teachers can help guide their way. But, it’s often their parents who come forward with questions or concerns about a dancer’s progress. Does your studio share a dance progress report with families? And if not, should you?
Many of the studios we work with say YES. Having an open and straightforward learning process means less drama from parents during placement season, and it also gives dancers a chance to work on their skills and push themselves to improve and make the cut.
Do you need to be careful with how you measure progress? Also a big YES. That’s because:
- You want good communication with families.
- You don’t want to hurt your dancers’ feelings.
- You don’t want to upset parents who think their child is the best dancer in the world.
- You don’t want great feedback to go to your dancers’ heads.
- You want to let parents know about potential for next level classes and the finances required.
- You want to be honest.
- You want the best for the student.
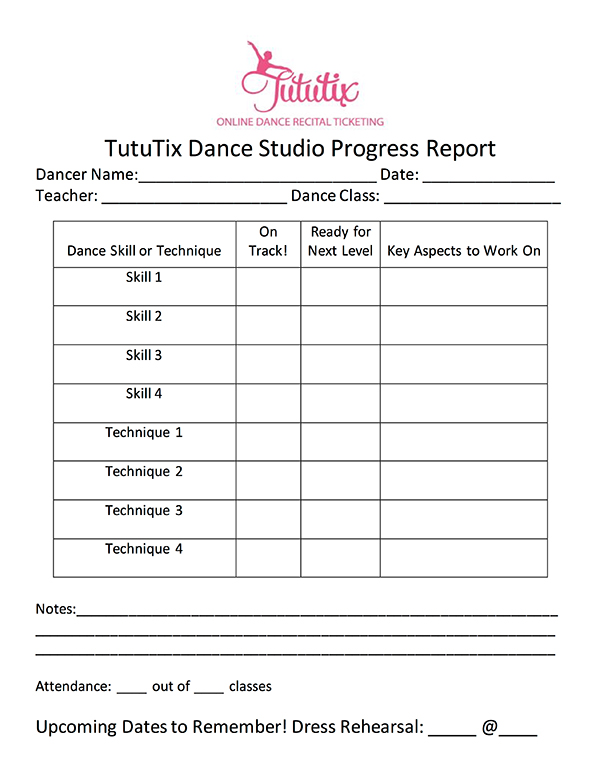
It’s a crazy balancing act!! To help dance studios out, we’ve created a fully customizable Dance Progress Report that you can adjust for your studio’s needs.
You can download that Dance Progress Report Template below.
[formfuse id=”908″]
Editing the Dance Progress Report
Did you like the template? Let’s get started editing it for your own studio. We’ll go from top to bottom of the Word document.
Adding Your Logo
First off, adding your logo. We added the TutuTix logo, a .jpeg image file, to the top of the document as a header. To replace our logo with your own, go to the “Insert” tab at the top of the page, in the main menu. There, you’ll see a button for “Header.”
Click that button, and you’ll see options for headers for your document, and can pick one that you like best. Then just drag and drop your studio logo into that section and resize it as needed!
Editing Information
The rest of the text in the document is fully customizable – you can change wording as you need to, and just be aware that the formatting might jump if you make some words too big.
As for the table we’ve created, Microsoft Word is T-R-I-C-K-Y. That bad boy will definitely jump onto another page without careful changes. We laid out 8 possible skills or techniques to evaluate in this report – for the sake of formatting, can you live with less being more?
You can always remove some rows if 8 ends up being too many (way easier than adding rows). To do that, right-click anywhere in the row that you want to delete. In that menu, you’ll see “Delete Cells.” In the next menu, click “Delete Entire Row” to remove only the row you’ve selected.
Want to get fancy and mess around with the spacing we’ve created? You can right-click into a row or column, and hit “Insert” in that menu. That will allow you to add an extra column or row if you need to include another bit of information. You can also change the overall size of the table by clicking and dragging from the bottom right-hand corner of the table. Best of luck to you!!
That Attendance Part
Need to tell a parent that their child hasn’t been showing up without even mentioning it to them? Include the number of classes the child has attended out of how many classes have been offered.
Not a WORD needs to be spoken – that parent will see raw attendance FACTS, and you can move on knowing that you’ve sent along the message.
Seize the Date
You now have in your hands: a billboard. This progress report will DEFINITELY be seen by parents, students, and might even make it onto the family refrigerator. Guaranteed attention.
Make the most of it! Include an important date or big-time reminder for parents. We made the reminder a date: the day and time of the winter recital dress rehearsal. You’re welcome to change that reminder to something else (like COSTUME INFO)!


